Table of Contents
How Do Drawing Tablets Work?
Introduction
Drawing digitally isn’t particularly difficult or simple just it’s different. You will initially experience a sense of ambiguity and move slowly for some time.
However, you will find a digital illustration to be much more enjoyable and a terrific method to enhance your creative process once you have settled in with the new equipment.
You must first understand how your drawing tablet operates in order to fully utilize all of its capabilities, which is why we are here today to help.
A drawing tablet offers a more natural and comfortable feel than a mouse or touchpad, making it easier to take notes, paint, illustrate, animate in 3D, create comics, and more.
How Do Drawing Tablets Work?
The Distinctions Between Drawing Tablets and Graphic Tablets
Artists commonly refer to pen tablet computers as “graphic” or “drawing” tablets. Both are portable tools that provide you with more options to express yourself than paint and pencils, although they differ slightly.
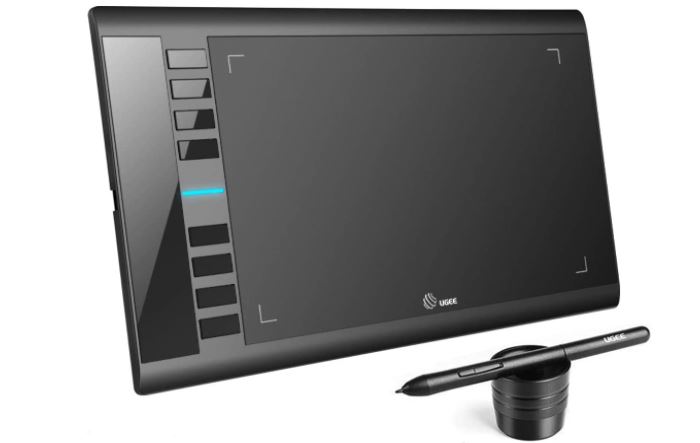
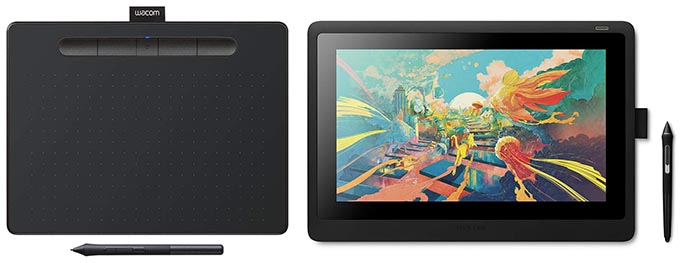
Graphics tablets are devoid of screens. They are merely responsive pads with digital pens that have additional buttons that serve as a mouse.
You must view your work on your computer’s display in order to see it, though. The Huion Inspiroy Q11K and Wacom Intuos Pro are two examples of graphic tablets.
However, drawing tablets include real touch displays that function as extensions of your PC’s display. These resemble the Huion Kamvas Pro 24 and the Wacom Cintiq 22.
A drawing tablet allows you to sketch and display your work on the same surface, whereas both lack storage and require connection to external devices.
Find out more here about the variations between drawing tablets and graphics tablets. Although you might be referring to graphic tablets rather than drawing ones and the phrases are interchangeable, the premise is the same for both types of devices.
Understanding How Drawing Tablets Work
You must become familiar with their components in order to comprehend how they operate. A drawing surface plus a pen make up a drawing tablet (also called a stylus). From the outside, it appears that way, but let’s examine the wider picture.
Understand the Tablet
The tablet, which is the major part, has a drawing space in the centre and a few buttons strewn throughout its sides. Express Keys are the name for these buttons. There should be 8 to 16 keys on any drawing tablet, and you can utilize them to access settings quickly.
One of them should carry out a task or command you set to it beforehand when you press it. You may add buttons to zoom in, expand items, or erase your most recent brushstroke, for instance. This speeds up work completion and compensates for the lack of a keyboard.

Before using your tablet, it must first be connected to your PC via a USB port. The manufacturer’s drivers must then be installed in order to calibrate the tablet to respond to your commands.
The sketching of a line produces electromagnetic impulses, which the tablet’s sensor board recognizes and collects.
If you have a drawing tablet, the image of what you are sketching will be displayed on both the tablet surface and the monitor of your PC. However, you are only able to view your work on the PC’s screen when using graphic tablets.
Get to Know Your Stylus
The digital pen, the second major component, comes in three different forms:
- Battery-powered,
- Rechargeable
- Electromagnetic resonance (EMR).
You most likely possess the last variety because it is the most recent and common. EMR-based stylus functions by absorbing waves from your tablet and converting them into electric energy, unlike the first two, which rely on batteries.
As a result, they don’t require batteries or charging wires. According to its intended use, your tablet will normally only respond to the tip of your pen as an input device.
When you move your stylus across a writing or drawing surface, the touchscreen picks up digital signals that are transformed into images on the display.
Stylus devices, like tablets, feature programmable buttons that can be used for a variety of purposes. However, there are typically only one or two of them. The most useful configuration would be to utilize one button as the right mouse click and the other as an eraser.
The pen can be used for more than just drawing; it can even replace the mouse. The pointer, for instance, displays where your pen is on the tablet screen when you move it over it. Additionally, you may tap or drag objects about the display using it.
Adjust the Pressure Sensitivity
That will determine how at ease you are using your new digital toolkit. Different drawing tablets respond differently to pressure applied by the stylus. Your lines will become darker and thicker as you press more firmly.
On the other hand, when you lightly press, your brush strokes will be thin and light. It will be difficult to adjust the pressure of your strokes at first, but with practice, you will become accustomed to the mechanism.
Pick a Software Program
Finally, you need software to start producing genuine art. The tablet you purchase will typically come with a CD or provide a free software download on its official website.
You have many free options to select if you find the software on your tablet unsatisfactory or if the model doesn’t come with an app in the first place.
We propose ArtRage and Krita for newcomer digital artists. Both have intuitive user interfaces with a selection of tools and brushes that resemble the appearance and feel of natural media.
Adobe Illustrator is a great place to start if you are more into vector art. Before you click the download option, make sure the software is compatible with the model of your choosing.
Final Thoughts
Nothing is more fascinating or frightful than a blank sheet of paper, right? We are hoping by this point your excitement for using your sketching tablet has surpassed your fear.
The most important thing is to hold the pen, draw some lines, and then follow where they lead. Just keep in mind that learning new techniques takes time.
While using a tablet and stylus to sketch can be challenging at first, it will undoubtedly get easier with practice, much like learning a piano.


